
How to Leave Meta: A Step-by-Step Guide to Getting Your Data Off Facebook and Instagram
The door's open. Take your photos, take your data, and don't look back. They've made enough money from you already. What you take out now, they can't feed into a system that scores you later.
Before you delete anything, you need to save what you want to keep. If you delete your account before your export is ready, Meta cancels the export and your data enters the deletion queue. Your photos, messages, and memories go with it. This guide takes you through the whole process in the right order, so you don't lose anything, get locked out of other services, or leave more behind than you need to.
Before you touch anything: read this first
If you want to know why I'm making this move, I wrote about it here: Why I'm Leaving Instagram, Facebook and LinkedIn.
Three things people get wrong when leaving Meta, and all three cause problems:
They delete their account before exporting their data, and lose years of photos
They forget they used "Log in with Facebook" on other services, and get locked out of Spotify, Airbnb, or other apps
They deactivate instead of deleting, which hides their profile but leaves all their data on Meta's servers
This guide goes in order. Follow it step by step. Don't skip ahead.
Phase 1: Know what you're working with
Check which accounts are linked through Meta Accounts Centre
Meta now connects Facebook and Instagram (and WhatsApp and Messenger) through a single Accounts Centre. Before you do anything, you need to see what's connected.
On desktop: Go to accountscenter.facebook.com (or accountscenter.instagram.com, they go to the same place). Sign in. You'll see all the Meta accounts linked to your email.
On mobile (Instagram): Tap your profile icon, tap the three lines (top right), tap Settings and privacy, then tap Accounts Centre.
On mobile (Facebook): Tap the three lines (menu), tap Settings & privacy, tap Settings, then tap Accounts Centre.
Write down every account you see listed. This is your starting point.
Check which apps and websites use "Log in with Facebook"
Most people forget this step and regret it.
On Facebook (desktop): Go to Settings & privacy > Settings > Apps and websites. You'll see a list of every service you've ever logged into using Facebook.
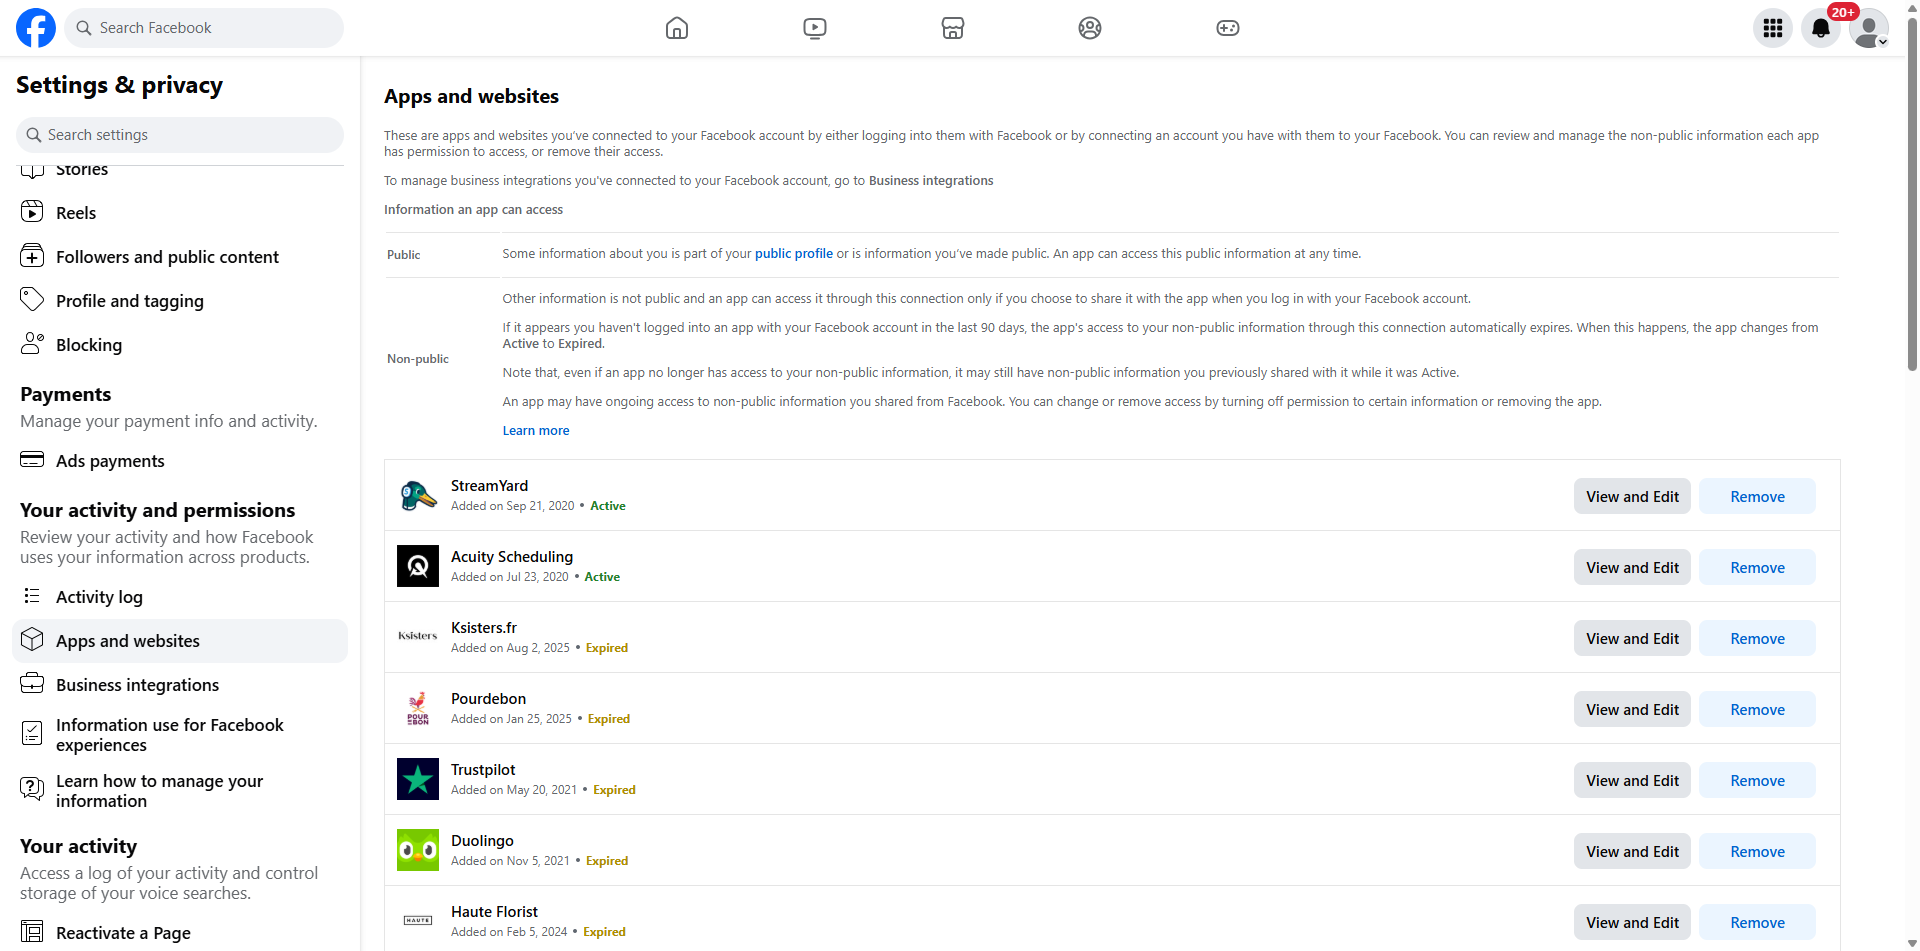
Check this page before you delete anything. Every one of these apps could lock you out if your Facebook login disappears.
What to do: Go through the list. For each service you still use (Spotify, Airbnb, Pinterest, whatever it might be), log into that service separately and add an email-based login before you delete Facebook. Otherwise you'll be locked out when your Facebook account goes.
Write down which ones you've updated. Tick them off. Don't rush this.
Phase 2: Download everything you want to keep
Download your Facebook data
On desktop (recommended for large downloads):
Click "Your information and permissions"
Click "Export your information"
Click on your Facebook account
Click Next
Choose "All available information" (you can filter later, but grab everything now)
For format, choose JSON if you want machine-readable data, or HTML if you just want to browse through it easily. HTML is easier for most people.
For media quality, choose High if you want your photos at full resolution
Click "Create export"
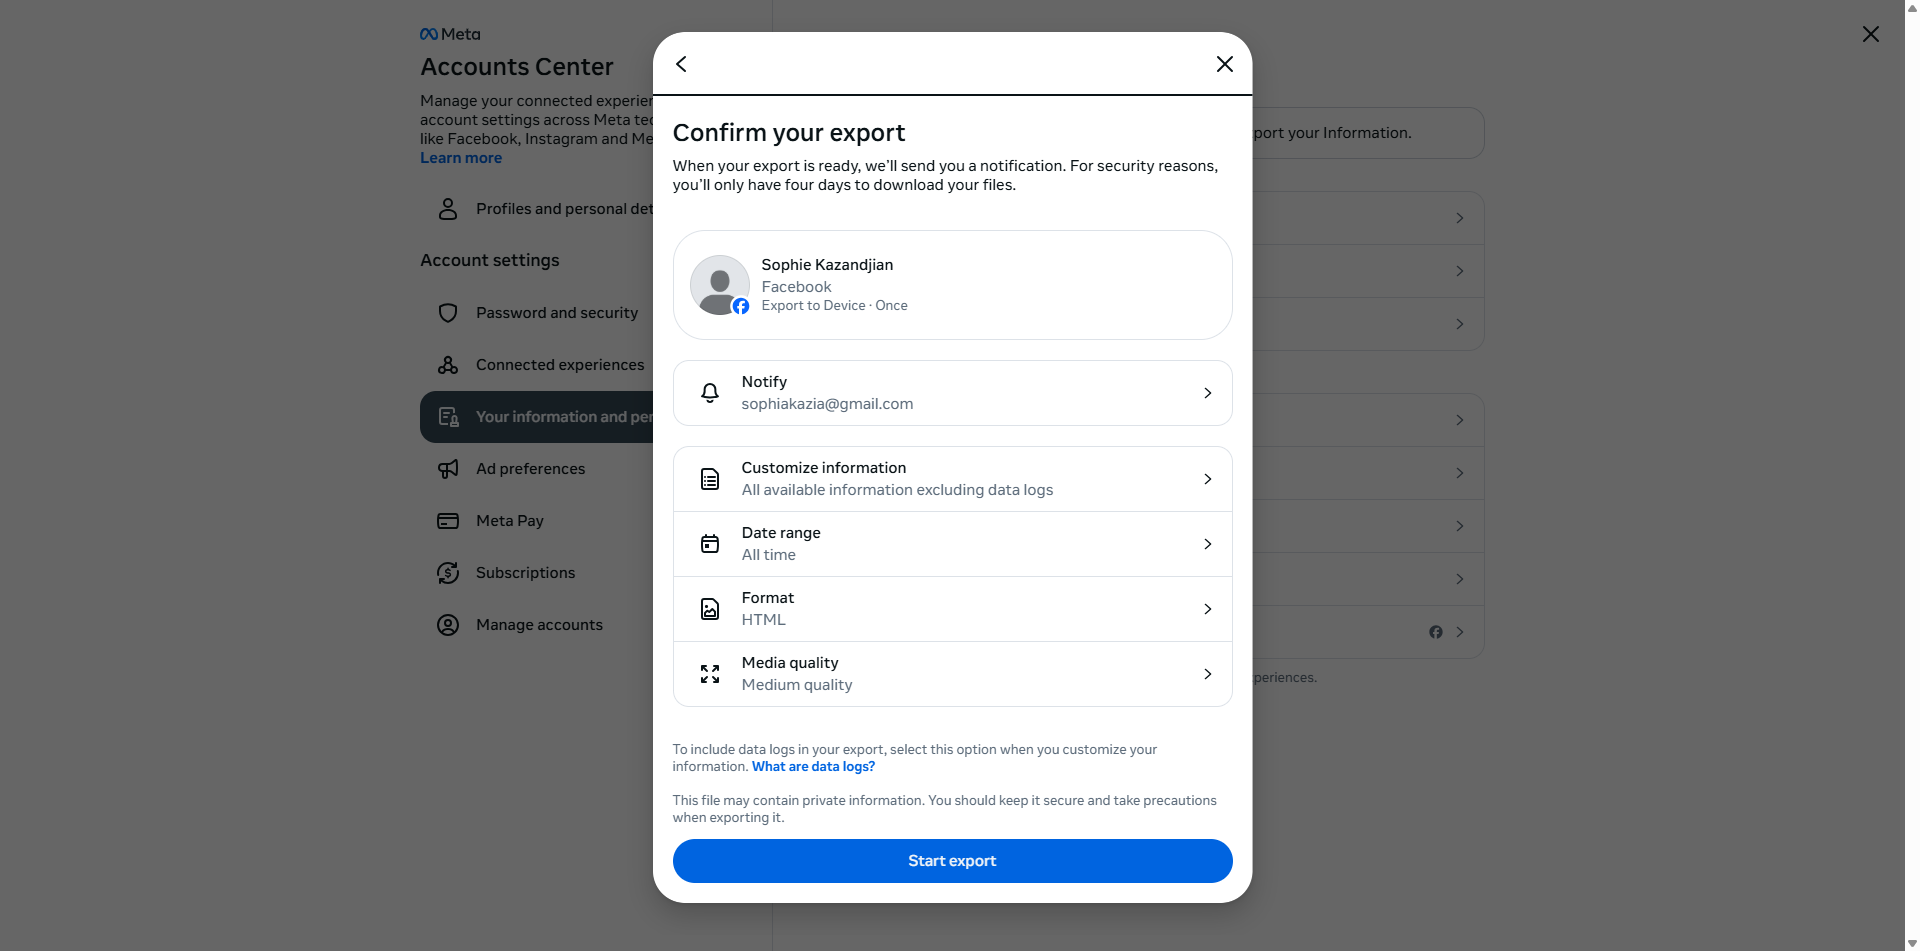
Before you hit Start export, change Media quality to High. You want your photos at full resolution, not compressed.
Meta will take anywhere from a few hours to a few days to prepare your download, depending on how much data you have. They'll email you when it's ready. You have four days to download it once the email arrives, so don't ignore it.
Download your Instagram data
The process is almost identical:
Go to accountscenter.instagram.com
Click "Your information and permissions"
Click "Export your information"
Click on your Instagram account
Click Next
Choose "All available information"
Choose HTML format and High media quality
Click "Create export"
Same deal: wait for the email, then download within four days.
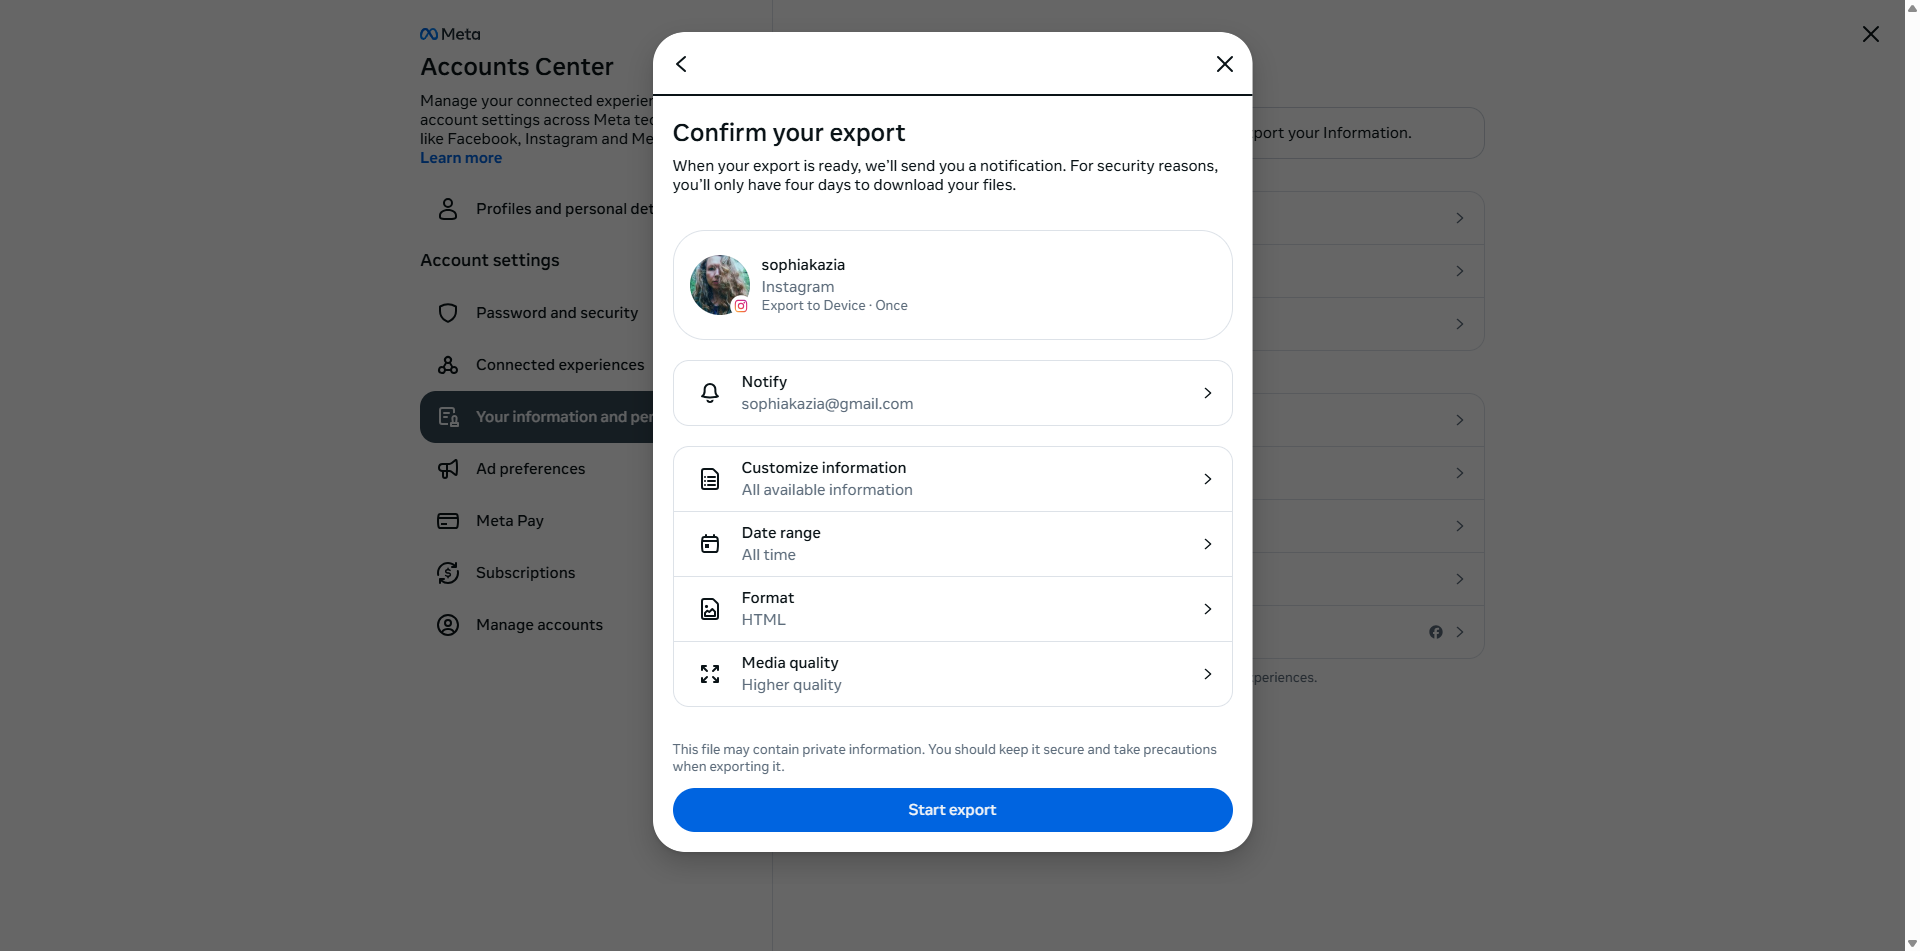
Set format to HTML, media quality to Higher, and date range to All time. You've got four days to download once the notification arrives.
What's in the download
Your download will arrive as a ZIP file. Inside you'll find:
Facebook: Your posts, photos, videos, messages, comments, reactions, friends list, groups, events, ad interests, search history, login history, and more. The photos will be in a folder called "photos" or "media."
Instagram: Your posts, stories (archived ones), reels, messages, comments, followers/following lists, saved posts, search history, and your profile information. Photos and videos will be in a "media" folder.
Save your photos properly
The downloads give you everything in bulk, but the photos won't be neatly organised.
Unzip the downloaded file
Find the photos/media folders
Copy the entire contents to wherever you store photos (your computer, an external hard drive, or a privacy-respecting cloud service like Proton Drive or Nextcloud)
Take the time to go through them and organise them into folders by year or event if that matters to you
If you're moving from Instagram to Pixelfed: You'll need to manually re-upload the photos you want on your new profile. There's currently no automated migration tool between Instagram and Pixelfed. Pick your best photos rather than trying to replicate everything.
Transfer photos directly to another service
Meta also offers a direct transfer option for photos and videos:
In the Accounts Centre, go to "Your information and permissions"
Click "Transfer a copy of your information"
Select your account
Choose what to transfer (photos, videos)
Choose a destination (Google Photos, Dropbox, or other supported services)
A decent quick backup option, though if you're leaving Big Tech entirely, downloading to your own device and then uploading to Proton Drive or similar is the cleaner route.
STOP. Do not move on until your exports have arrived.
Meta can take hours or days to prepare your files. Wait for the emails. Download both ZIP files. Open them and check the photos are there. Back them up somewhere safe (hard drive, Proton Drive, wherever you keep things). Only then move on to Phase 3. If you delete your account while an export is still being prepared, Meta cancels the export request and your data goes into the deletion queue. There is no undo.
Phase 3: Tell people where to find you
Before you delete, let people know where you're going. Once you delete, you can't message anyone through these platforms, so do this while you still can.
Post on both Facebook and Instagram: Something simple: "I'm leaving Facebook/Instagram. You can find me at [your Mastodon handle] and [your Pixelfed handle]. If you want to stay in touch, message me your email or Signal number before I go."
Pin the post if you can. Leave it up for at least a week or two before you delete.
Message your closest contacts directly: Don't rely on the algorithm showing your farewell post to the people you actually care about. Send direct messages to the people you want to keep in touch with.
Phase 4: Clean up before you go
Before deleting, reduce what Meta holds on you. Deletion removes most things, but doing a manual clean-up first is belt-and-braces.
On Facebook:
Delete your posts: Go to your Activity Log (Settings & privacy > Settings > Your activity > Activity log). You can select and delete posts in bulk.
Remove photos: Go to your photos, select albums, and delete them.
Clear your search history: Settings & privacy > Settings > Your activity > Search history > Clear searches.
Remove personal info from your profile: Edit your profile and blank out your phone number, email, birthday, workplace, education, and relationship status.
Unlike pages and leave groups: This removes your association with them.
Remove apps and websites: In Settings > Apps and websites, remove all connected apps.
On Instagram:
Delete or archive your posts: Go to Your activity > Photos and videos > Posts. Select and delete.
Clear search history: Settings > Your activity > Search history > Clear all.
Remove linked apps: Settings > Website permissions > Apps and websites.
Edit your bio: Remove personal information.
Yes, this is tedious. But the less data sitting on Meta's servers during the 180-day retention period after deletion, the better.
Phase 5: Delete (not deactivate)
The difference between these two options is everything.
Deactivation hides your profile but keeps all your data on Meta's servers. You can come back any time. Meta keeps everything. This is what they'd prefer you to do.
Deletion is permanent. After a 30-day grace period (during which you can change your mind by logging back in), Meta begins removing your data. Your profile, photos, posts, and videos become inaccessible to other users.
Delete Facebook:
On desktop:
Go to Settings & privacy > Settings
Click "Accounts Centre" (top left)
Click "Personal details"
Click "Account ownership and control"
Click "Deactivation or deletion"
Select your Facebook account
Select "Delete account"
Follow the prompts
On mobile: Same path through the Settings menu.
Delete Instagram:
Go to Accounts Centre
Click "Personal details"
Click "Account ownership and control"
Click "Deactivation or deletion"
Select your Instagram account
Select "Delete account"
Follow the prompts
Warning: If your Instagram uses "Log in with Facebook" and you delete Facebook first, you may lose access to Instagram. Delete Instagram first, or set up a standalone Instagram login with an email address before deleting Facebook.
Phase 6: What happens after you delete
What Meta says, and what independent research has actually found, are two different things.
The 30-day grace period: If you log back in within 30 days, the deletion is cancelled and everything comes back. So stay logged out. If you have the apps on your phone, delete them immediately after requesting deletion. Otherwise muscle memory will have you logging in without thinking.
The 90-day removal period: Meta says it takes up to 90 days to remove your data from their active systems after the 30-day grace period.
The 180-day reality: Research has found that Meta retains user data for up to 180 days after account deletion, in backup storage. During this time your data could still be caught up in a data breach.
What they keep even after that:
Messages you sent remain in other people's inboxes
Log data (timestamps, IP addresses, activity records) may be retained indefinitely for legal and security reasons
Anything friends posted about you (photos they tagged you in, posts that mention you) stays on their accounts
Meta has admitted that copies may remain in backup storage "to recover in the event of a disaster, software error, or other data loss event"
If your data was shared with data brokers or advertisers while your account was active, deletion from Meta doesn't affect those copies
Your GDPR rights: If you're in the EU, you have the right to request erasure under GDPR. Meta is legally required to delete your personal data "without undue delay." If you want to be thorough, submit a formal GDPR erasure request separately from the standard account deletion. That puts a legal obligation on them, rather than leaving it to their own internal processes.
Phase 7: Clean up the traces
Even after deletion, Meta may hold data about you even if you've never had an account (so-called "shadow profiles," built from other people's contact lists).
Remove your contact information from Meta's systems:
Go to facebook.com/contacts/removal
Enter your phone number or email address
Follow the instructions to request removal
This removes your details from Meta's contact-matching database, which is built from the address books of people who have given Meta access to their contacts.
Search for yourself: After 30 days, search for your name on Facebook and Instagram to verify your profiles are gone. If they're still showing up, something went wrong and you should re-request deletion.
Where to go instead
You've already made some of these moves, but for your readers:
Photos: Pixelfed (federated, ad-free, connects to the Fediverse)
Messaging: Signal, Delta Chat
Group conversations: Signal groups, or Matrix/Element for larger communities
Cloud storage for photos: Proton Drive, Nextcloud (self-hosted)
Staying in touch with people who won't leave Meta: Some people won't move. Get their email or phone number. You don't need to be on the same platform to stay in someone's life.
What you need to know about what's left behind
Leaving Meta is not hard technically. It's mostly tedious. The export process works, the deletion process works, and your data will eventually be removed from their active systems.
What Meta won't do is guarantee that every trace of you is gone. Log data, backups, shadow profiles, data already shared with third parties, and messages in other people's inboxes all persist beyond your control. That's the price of having used these platforms, and there's no way to fully undo it.
But you can stop feeding the machine going forward. Every day you're on the platform, you're generating new data that's being used to profile you, target ads at you, and train AI models. Leaving stops that flow. It doesn't erase the past, but it cuts off the future they were counting on.
If you want to understand why leaving these platforms is about more than just privacy preferences, read When We Stop Trusting Humans, Who Do We Hand the Power To?
FAQs
-
Deactivation hides your profile from other people but keeps all your data on Meta's servers. You can come back any time by logging in again, and Meta retains everything. Deletion is permanent. After a 30-day grace period, Meta begins removing your data from its active systems. If you want to actually leave, you need to delete, not deactivate.
-
No. Messenger is tied to your Facebook account. Once you permanently delete Facebook, Messenger goes with it. If you only deactivate (which I don't recommend), you can keep Messenger running separately. But deactivation leaves all your data on Meta's servers, so it defeats the purpose of leaving.
-
Yes, unless you set up alternative logins first. Go to Settings > Apps and websites on Facebook and check which services use "Log in with Facebook." For anything you still use (Spotify, Airbnb, Pinterest, and so on), log into that service separately and add an email-based login before you delete your Facebook account.
-
No. The 30-day grace period is your only window. If you log back into Facebook within those 30 days, the deletion is cancelled and your account is restored. After 30 days, the deletion process begins and cannot be reversed. Delete the apps from your phone straight away so you don't log back in out of habit.
-
Eventually, mostly. Meta says it takes up to 90 days to remove data from active systems after the 30-day grace period. Research has found data can persist in backup storage for up to 180 days. Messages you sent stay in other people's inboxes permanently. Log data (timestamps, IP addresses, activity records) may be retained indefinitely. And any data previously shared with advertisers or data brokers is not affected by your account deletion at all.
-
They stay. Photos that other people posted and tagged you in remain on their accounts. Your tag is removed, but the photo itself is theirs, not yours. The same applies to posts that mention you, comments on other people's posts, and group photos. You have no control over content that belongs to other accounts.
-
Yes. They are separate accounts even though Meta links them through Accounts Centre. You can delete one and keep the other. One thing to watch: if your Instagram uses "Log in with Facebook" and you delete Facebook first, you could lose access to Instagram. Either delete Instagram first, or set up a standalone email login for Instagram before touching Facebook.
-
Anywhere from a few hours to several days, depending on how much data you have. Meta will email you when the download is ready. You then have four days to download it before the link expires. Do not request account deletion while an export is still being prepared. Meta cancels pending exports when a deletion request comes in.
-
Meta builds profiles on people who don't even have accounts, using contact information uploaded by other users from their phone address books. After you delete your account, go to facebook.com/contacts/removal and enter your phone number and email address to request removal from this contact-matching database. It won't catch everything, but it removes what Meta holds directly.